Baby Blankets: How to make my favorite projects
- Kat Zimmermann

- Nov 20, 2020
- 20 min read
Updated: Aug 21, 2023
Ah, baby blankets. The perfect project to:

Practice a new skill
Decompress after a tricky project
Work on during your 1001 Zoom meetings
Bust through your stash of yarn
Bust through your stash of scrap fabric (AKA cabbage)
Give away to friends and family
Donate to charities

I love making baby blankets. They're small (standard size is usually around 3 ft x 3 ft), they're quick, you get to use all the best yarns and fabrics, and when you're finished, you get to give it away so it's not taking up space in your house. In fact, my first crochet project ever was a baby blanket. BEHOLD:
It's terrible and I love it. Notice the beautiful, unplanned hourglass shape. See the clear tension issues between the beginning and end of the project. Feast your eyes on the center row of dc ch 1 that looks like they somehow turned into treble crochets. Fantastic.
I love making baby blankets so much and have made so many that I somehow don't even have pictures of them all! I love them for all of the bullet point reasons I listed at the top of this post and I can't take pictures of them anymore because I've given them all away. Between big projects, I'll whip up one or two and squirrel them away so that any time I hear of someone having a child, I have a gift waiting in the wings.
In the interest of encouraging others to try new things and grow their skills, I'm including not one but THREE tutorials below: one crochet, one knit, and one sewn. If you both knit and crochet, yes, the sections are very similar because so are the concepts. The sewn blanket is also my first quilt ever (remember how I said these are great for trying something new?). Enjoy!
Project the First: Crochet
Materials:
Size H crochet hook
Any yarn, any weight- you'll need about 1 pound of yarn
--->don't be afraid to buy a little extra if you're not working from a stash
--->if you are working from a stash, try to choose yarn that's ish a similar weight
--->for beginners, stick to a medium weight, like a 4, until you're comfortable branching out
Any crochet stitch dictionary
Q: Wait, why do I need a stitch dictionary? I thought this was a tutorial...
A: It is! It's a tutorial of how to try new things. For crochet, that means knowing how to read the stitch dictionary so you can actually try something new.
Q: I'm a beginner and I don't own a stitch dictionary. What should I do? A: No worries, friend. There are tons of free resources available online. Try this Crochet Stitch Dictionary from Crochet 365 Knit Too or this extensive Stitchionary from New Stitch a Day.
(Step 1) Determine your goal and Decide the shape of your blanket.
I say determine your goal because it will very much affect your choices of pattern. For example, if you're just starting out, you'll probably want to do a basic rectangle with only one or two different stitches. If you want to explore a new skill, like working in the round, your choices will be different. If you just want something to work on mindlessly during Zoom calls...same as for a beginner, choose something simple!
Where shape is concerned, you've got four basic choices:
Rectangle, one piece (like my first blanket, shown above) - worked bottom to top OR from the center out if you're working in the round
Circle or hexagon, one piece (another great option if you're learning to work in the round)
Rectangle or squares assembled from many blocks (excellent for trying lots of new stitches)
Hexagon blocks assembled into a large rectangular-ish shape
See the photos in the gallery below for some examples.


The first blanket in a soft yellow yarn was worked in a basic shell pattern, meaning it used mainly double crochets and chains, with some single crochets on the border. You can download the Lion Brand Dreamy Lace Baby Throw pattern here.
The second blanket shown is a sea green rectangle worked using Caron Simply Soft yarn. It was worked using a slight puff stitch (multiple dcs in one space) all the way up and then surrounded in a very simple border (first round sc, second round dc, third round sc)..
The third blanket is an excellent example of an experimentation: worked in white yarn, this blanket has a rose motif at the center, surrounded by several rounds of chained lace, then another round of "petals", two rounds of dc, and repeat the whole thing a third time. This was based on a motif out of a stitch dictionary and was an experiment in lace.
Blanket number four is an assembly of two square motifs in three colors (rose pink, teal, and lavender). The squares were then single crocheted together and given a simple border in dark grey to unify the piece. I choose this pattern because I was doing a lot of travel and assembled blankets work well for that. Squares used here are I Got Rhythm and On the Street Where you Live by Polly Plum.
The fifth blanket was similarly made and was an adventure in working with hexagons. Here I used a simple flower hexagon motif from one of my stitch dictionaries, working in blue and yellow for some color work. Hexes were then stitched together in single crochet using dark grey yarn and given a dark grey border.
Finally, one of my favorite and yet very simple blankets: a color work dragonfly in mint green on a baby blue background and a bobble stitch border. This blanket was done entirely in double crochets, changing colors where appropriate to make the picture. You can do something similar by following filet crochet patterns and swapping the solid "pixels" for a color and switching the background to all dc instead of dc with chains. I used this Dragonfly chart from Nezumiworld.
To choose the right shape for your next project, consider your goal(s) and what you think you'll enjoy most!
(Step 2) Choose your stitch(es)
This will relate back to your goals. Some examples and suggestions:
Beginners - choose one stitch or stitch pattern from your stitch dictionary. You might choose something like a ripple stitch or a puff stitch.
Learning to work in the round - granny squares and their variations are the classic choice here, but you can also branch out and choose a circular motif
No longer a newbie, but not sure where to go next - sampler blankets are a great option here. Choose a handful of stitches to learn (or more, you can always make each square unique) and plan to sew or single crochet them together at the end.
(Step 3) Get started!
Here's where we get tricky - stitch dictionaries don't put the pattern together for you, they tell you something like "Multiple of 8 sts plus 4" (Basketweave crochet stitch on New Stitch a Day). What does that mean???
There are two pieces at work here - the first is the "multiple of 8 sts." This means that the actual pattern, after you get past the foundation row, will have some multiple of 8 stitches. In this particular example, you FPdc 4 sts, then BPdc 4sts all the way across. So we're repeating those 8 stitches over and over. That's the multiple of 8.
The second is "plus 4." Why 4?
In this example, there are two plain double crochets at the beginning and end of the rows. The remaining plus 2 chains are to provide the "height" to turn and begin the first row.
Let's look at another example using the soft moss stitch. Here, the foundation is "chain a multiple of 2 + 1." The pattern is alternating sc and dc, so that's the multiple of 2. Why do we need the plus 1? We again need a border stitch at the ends. In this case, it's a hdc. So then why is it +1 and not +4 like in the last example? The hdc which counts as the first border stitch here is represented by a chain 2, so it rolls right into that "multiple of 2," meaning we only have to account for the border stitch space on the other side, hence the +1.
It's OK if that doesn't make a lot of sense just yet, you really only need it if you decide to try writing your own patterns.
To start, chain your foundation row as a multiple of whatever until you decide it's the right length, then add the "plus x" on to the end and you're on your way! If you're not sure what length to make it, crochet a gauge swatch, measure, and then do a little division to figure out how many repeats you need to get the right size.
(Step 4) Work the project & Join the pieces
Once you've gotten started with your foundation row, continue to follow your stitch dictionary for the motif or stitches you want to use. I definitely recommend using a tracker like Row Counter to keep you on pace with the pattern until you have it memorized.
If you're doing a sampler project with multiple pieces, you'll need to create enough squares/hexes/rectangles to sew together at the end and get the size blanket you're looking for.
When all your pieces are bound off and have been blocked (because you always block your pieces, right?), pin and sew or sc together.
To sc together (shown in two blankets above), hold the pieces wrong sides together. Join your yarn to the first stitch with a slst. Ch 1 then sc across, working the sts into BOTH pieces so the sts line up. Don't be too worried if you end up with an odd stitch here or there, you can always sc2tog through one piece to sort of blend it in and no one will notice!
To sew together, place the right sides of each piece facing up on a flat surface. Use a tapestry needle to join the pieces, weaving from one piece to the next with a long piece of yarn, picking up yarn on either side. Be sure to keep your stitches aligned as you work and pull tight every few inches. Pinning the pieces together using crochet stitch markers is helpful to keep everything lined up when working with large pieces or trying this for the first time.
There are several methods to do the stitching depending on whether you're joining at the sides or the top - here's a nice summary of three ways from Red Heart Yarns.
(Step 5) Finish off your project with a border
There are a TON of borders out there, so find one that suits your fancy! My go-to border is as follows:
Finish your last row but don't bind off and don't turn.
R1: Ch 1, sc around, putting 3 sc in each corner st. Join to the first sc with a slst.
R2: Ch 2, dc around, putting 3 dc in each corner st. Join to the first dc with a slst.
R3: repeat R1. Bind off. Weave in end.
That's it, time to celebrate your accomplishment!
Project the Second: Knit
Materials:
8 mm circular knitting needles
--->You'll want the circular needles for this even though it's a small blanket. The cable makes the project significantly easier to handle
Any yarn, any weight- you'll need about 1 pound of yarn
--->don't be afraid to buy a little extra if you're not working from a stash
--->if you are working from a stash, try to choose yarn that's ish a similar weight
--->for beginners, stick to a medium weight, like a 4, until you're comfortable branching out
Any knit stitch dictionary
Q: Wait, why do I need a stitch dictionary? I thought this was a tutorial...
A: It is! It's a tutorial of how to try new things. For knit, that means knowing how to read the stitch dictionary so you can actually try something new.
Q: I'm a beginner and I don't own a stitch dictionary. What should I do? A: No worries, friend. There are tons of free resources available online. Try this one from Knitting on the Net or this extensive library from New Stitch a Day.
(Step 1) Determine your goal and Decide the shape of your blanket.
I say determine your goal because it will very much affect your choices of pattern. For example, if you're just starting out, you'll probably want to do a basic rectangle with only one or two different stitches. If you want to explore a new skill, like working in the round, your choices will be different. If you just want something to work on mindlessly during Zoom calls...same as for a beginner, choose something simple!
Where shape is concerned, you've got two basic choices:
Rectangle or square, worked bottom to top
Rectangle or squares assembled from many blocks (excellent for trying lots of new stitches)
You could, of course, also join shapes like hexagons (great video here which crease some snowflake-esque hexes) or join shapes that aren't all the same size.
See the photos in the gallery below for some examples. Sorry there aren't more examples here, I haven't been knitting near as long as I've been crocheting!


The first blanket shown on the left is a very simple blanket made of 9 squares in stockinette. The center square has a hidden rabbit motif done in purls with a stockinette background. The yarn is a variegated blue, green, and white which creates an almost-striped pattern. The squares are placed so the stitches run in perpendicular directions. Finally, there's a basic crochet border done in some white scrap yarn. The goal here was to practice my knits and purls and increase my speed; you can tell my tension needed work too by how off some of the final joins are in places,creating some bunching.
The second blanket, shown in the middle, is a basic chevron blanket made using a Caron Big Cake in Summer Berry Tart, a self-striping yarn. A basic chevron is a great way to continue working on knit and purl skill and speed while also learning how to increase and decrease. I used this pattern from Espace Tricot, but a basic chevron is available in just about every stitch dictionary as well.
**Note: If you do the pattern above and you're new, take a few minutes to learn ssk instead of spending 20 minutes being confused and frustrated when your stitches don't add up (which is what I did...).
The third blanket, shown on the right, is another chevron pattern with stripes. This time done in a garter stitch chevron with color changes to make a rainbow blanket with cream "break" stripes between each color to soften the brightness. The garter stitch chevron makes the fabric quite stretchy which is nice when trying to swaddle a little one! This pattern is a great progression to focus on learning to increase and decrease while only needing to otherwise use a knit stitch. I used this pattern by Catherine Anderson for this project.
To choose the right shape for your next project, consider your goal(s) and what you think you'll enjoy most!
(Step 2) Choose your stitch(es)
This will relate back to your goals. Some examples and suggestions:
Beginners - choose one stitch or stitch pattern from your stitch dictionary. You might choose something done with just knits and purls, like a moss stitch or a basketweave.
Advanced beginner - same as beginner, but choose a pattern that uses some increases and decreases, like the chevron examples above. This will help you learn basic shaping which caries over into all kind of 3D projects like socks and sweaters.
No longer a newbie, but not sure where to go next - sampler blankets are a great option here. Choose a handful of stitches or cables to learn (or more, you can always make each square unique) and plan to sew or single crochet them together at the end.
Ready to try something more difficult, but not ready to commit to a big project - I stand by the sampler blanket. Check out some intermediate level stitches, like this Leaf Panel, and give them a go as a standalone block. Make another block of the same to keep working it or mix it up with some other options!
(Step 3) Get started! Casting on...
Here's where we get tricky - stitch dictionaries don't put the whole pattern together for you, they tell you something like "Multiples of 8 + 5" (Basketweave stitch from New Stitch a Day). What does that mean???
There are two pieces at work here - the first is the "multiple of 8 sts." In looking at the pattern, you'll see that each row is made of a repeat of K5, p3 all the way across. There's your multiple of 8.
So what's the +5? Humans like symmetry. We want the rows to start and end with the same knit stitches, so we need another K5 at the end just as we had at the beginning. Hence the +5.
Let's look at another example: the vertical herringbone stitch. Here, we cast on "multiples of 7 + 1." So why the multiples of 7? Look at row 2 of the pattern: K2tog, k2, krl, k2, rep. K2tog uses 2 stitches but creates only one, then we have two more knit, krl which creates 2 stitches, and then another two knit. So total, we have 7 stitches over and over (notice we decease and increase in each repetition, that's what makes the herringbone pattern).
Why the +1 then? Again we're looking for symmetry here. K2tog creates what looks like a plain knit stitch, then followed by k2. So the beginning of the piece starts with a visual k3. We want to end the row with the same, but our repeated portion only has k2. So when we get to the end, we add that extra K1 to even it out.
It's OK if that doesn't make a lot of sense just yet, you really only need it if you decide to try writing your own patterns. The great thing about knitting is that there are a lot of patterns and stitches that just say "multiple of x," making the casting on much quicker!
To start, cast on as a multiple of whatever until you decide it's the right length, then add the "plus x" on to the end and you're on your way! If you're not sure what length to make it, knit a gauge swatch, measure, and then do a little division to figure out how many repeats you need to get the right size.
(Step 4) Work the project & Join the pieces
Once you've gotten started with your foundation row, continue to follow your stitch dictionary for the stitches you want to use. I definitely recommend using a tracker like Row Counter to keep you on pace with the pattern until you have it memorized.
If you're doing a sampler project with multiple pieces, you'll need to create enough squares/hexes/rectangles to sew together at the end and get the size blanket you're looking for.
When all your pieces are bound off and have been blocked (because you always block your pieces, right?), pin and sew or single crochet together if you're bi-craftual.
To sew together, place the right sides of each piece facing up on a flat surface. Use a tapestry needle to join the pieces, weaving from one piece to the next with a long piece of yarn, picking up yarn on either side. Be sure to keep your stitches aligned as you work and pull tight every few inches. Pinning the pieces together using crochet stitch markers is helpful to keep everything lined up when working with large pieces or trying this for the first time.
There are several methods to do the stitching, depending on where you're joining and how much you care if the seam is hidden. Here's a nice demo from Bickford Seam. You can also pin right sides together and use a plain whip stitch if you really don't care that the seam will be visible.
(Step 5) Finish off your project with a border
There are a TON of borders out there, so find one that suits your fancy! My go-to crochet border is as follows:
After binding off, join your yarn at a corner.
R1: Ch 1, sc around, putting 3 sc in each corner st. Join to the first sc with a slst.
R2: Ch 2, dc around, putting 3 dc in each corner st. Join to the first dc with a slst.
R3: repeat R1. Bind off. Weave in end.
There are plenty of knit borders as well, many are worked separately and stitched on, but you can also pick up stitches and knit stitches to begin the border in one piece with no sewing. Here's a quick tutorial from The Spruce Crafts if that concept floats your boat. If you're using the pattern for a border, but plan to pick up and knit the stitches, make sure you count as you go so you can be sure to end up with just the right number of stitches!
That's it, time to celebrate your accomplishment!
Project the Third: Sewn
This is it, the big finale - my first quilt ever. With instructions for you to try and learnings so you don't have to make the same mistakes!

Materials:
Fabric for the quilt top - I used scraps for this and cut out my squares
Fabric for the backing - you'll need to figure out the size of your quilt, then add 4 inches to each length for this piece (e.g. a 36" x 36" blanket will need a backing piece cut 40" x 40")
Quilt batting - I went with cotton because I don't like to buy plastic (polyester) if I can avoid it and because cotton is more skin-friendly and insulates well
Bias tape - check out my post on how to make your own here - you'll need enough to go all the way around plus about a foot of overlap
Some scrap yarn to tie the quilt
sewing machine and thread
walking foot - not strictly required but highly recommended
cutting mat, rotary cutter, quilters rule
iron, ironing board
Off we go!
(Step 1) Determine quilt size & layout, then cut your pieces.
Time for a little math (it just wouldn't be me if there was no math involved). I decided to go with a very basic blanket made up of nothing but squares. I wanted a standard baby blanket size of 36" x 36" and, looking at the size of scraps in my basket, decided to make the squares 3" x 3" each. This meant I would need 12 rows of 12, or 144 squares total.
BUT WAIT. Don't forget your seam allowance! I like 1/2" seam allowance (most quilters use 1/4", I decided I'm not ready for that just yet), so that meant I was cutting 4" x 4" squares.
I used a rotary cutter and quilters rule to help cut the squares quickly without needing to make any marks.
If you're very organized or just using new fabric instead of scraps, you should probably do a touch of planning first to decide on the layout of your squares, then count how many you'll need from each fabric.

Since I was using scraps, I cut everything out and was then pleasantly surprised when I was able to get something resembling a planned pattern. Shown here, I laid out the pieces on the floor to plan my pattern.
Also shown here: Freddie (dog) getting in the way and wanting to lay on the fabric.
(Step 2) Check your layout and organize your sewing agenda.

After I finished deciding on the layout (above), I carefully stacked my pieces into piles so the pieces were in order from top to bottom.
To keep the rows in order, I used my hem clips to color-code using rainbow order from top to bottom (e.g. red clip means first row, then orange, etc.). Since I had 12 rows, I needed to go beyond the 6 rainbow colors (indigo is a shade, not a color, fight me) so I used "double red" for row 7, "double orange" for row 8, etc.
Of course, you could always do something totally reasonable like mark the backs with chalk or a pencil. You know, like a sane person.
(Step 3) Sew the squares together to make strips for each row.

Easy and boring, but that's why I picked squares! Sew using 1/2" seam allowance (or the 1/4" you're "supposed" to use for quilting) in the order you've stacked.
Trim the seams to 1/4", I used pinking shears, and press open.
In doing some reading, I think experienced quilters actually press the seams to one side, but I still haven't figured out why that would help for squares. Down the center worked just fine for this project.
(Step 4) Pin and sew the strip together to finish your quilt top.

Definitely take the time to lay out all the strips and pin them together.
You want to be careful here and as precise as possible. This is the part where it becomes clear if you did a good job precision-wise when cutting and sewing the strips (spoiler alert: I have room for improvement).
Once sewn, trim the seams down to 1/4" and press.

To finish the quilt top, we also have to prepare the edges for bias tape. This is where using 1/2" seam allowance did not do me any favors. Use the quilters rule and rotary cutter to trim 1/4" off each edge so there is only 1/4" seam allowance remaining all the way around.
Bonus: If you could have been more precise earlier, this offers the chance to clean up the edges a bit.
(Step 5) Baste together the backing, batting, and quilt top.

First, lay out your backing, right side DOWN. We'll be basting the pieces together in their final formation, no turning out involved in quilting.
Pin the backing so it lays smooth. I pinned directly into my carpeting and realized later that blocking mats would have worked well for this. Also pictured here: Freddie (dog) being very sad about not being allowed to lay down on my quilt while it was covered in pins.
Next, lay down the batting so it covers the backing.
Finally, add your quilt top, right side UP.

Using large basting safety pins, start at the center of the quilt, working your way outwards and smoothing as you go. Pros leave their pins open until they're finished, then close all the pins at once (I did not).
If needed, trim the batting so it's even with the backing at this point.
(Step 6) Tie the quilt (or quilt it, you do you).

I went with ties because this was my first quilting project ever and, quite frankly, I found the walking foot a little intimidating. I will probably try stitching in the ditch (sewing along the edges of the pieces) next time.
To do the ties: cut a piece of yarn the width of your blanket plus a little and thread into a needle with a large eye. I think I used a carpet needle here because that's what I had, but a tapestry needle should do well also. Work your way across, creating a very short stitch every hands-width or so. What I did was every other square, put the needle through then pull the needle up on the other side of the same seam to make a stitch. Repeat all the way across. Repeat working vertically until all anchors/ties are in place.
You'll see in the photo I also used a thick leather thimble to protect my fingers and a small, rubber grippy thing to help pull the needle through all the layers. I fou
nd a twisting motion to be most effective in getting the needle all the way through.
Be sure to check the info on your batting here, which should tell you how closely the stitches or ties need to be placed. Mine said 9", so I went with 6" (two squares) to be safe.

Now that your yarn is all in place, cut each "giant stitch" of yarn halfway between the anchor points. Then tie the pieces together at each anchor with a square knot (left over right, then right over left, pull tight).

Trim the ties to about an inch long. You can now remove the basting safety pins from everywhere except for the edges of the quilt.
(Step 7) Baste around the edges.
Install the walking foot on your sewing machine if you have one, being careful to follow the instructions that came with the foot. Grab a scrap of your batting and some scrap fabric to go on top and bottom to test it out and check your tension before working on the quilt.
When you've checked the tension and know the foot is working properly, use a large stitch size (I use a 7) to work your way around the edge of the blanket.
You can see in the video that I did a single backstitch at the beginning because I was worried about the basting coming undone before I finished the actual quilting process. I also replaced the safety pins on the edges with regular straight quilting pins to make it easier at the machine. Finally, you'll notice I'm using slightly too large seam allowance - try to make it as narrow as possible so you don't have to rip out the basting later.
(Step 8) Bind the edges with bias tape.
Bias tape creates a really clean edge to your quilt that looks really nice. Starting at the bottom of your quilt, pin the bias tape around the edges of the quilt. Be sure to leave a few inches at the beginning (I'd say maybe 5" or so) NOT pinned in place. When you get to the corners, you can create a mitered edge like shown in the video:
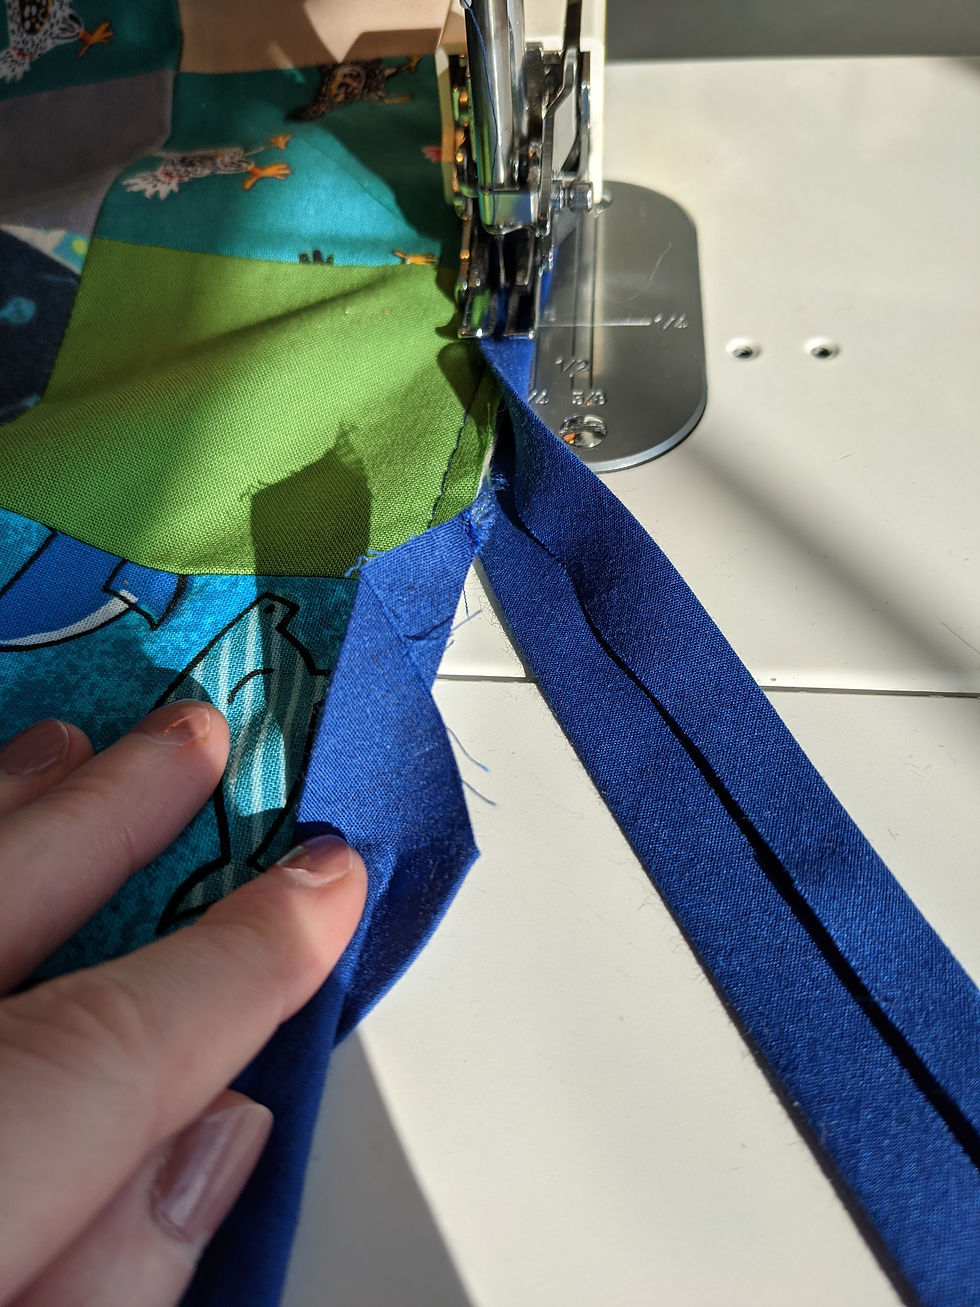
Pin very close to the corner. Then, hold the tape in place with one hand and "flip" the loose tape upward, away from the turn so it makes a little triangle of fabric. Then, "flip" it again, tucking the triangles into the fold of the bias tape to create a little cap at the corner. Pin in place and keep working around.
Once in place, sew around, using your walking foot and a regular stitch size (I like 2.5). When you get to the end, STOP a few inches before the raw end.

Cut the tape so there's about two inches of overlap and press the raw edges of each end under about 1/4".
Continue to stitch down the bias tape so they overlap.
When finished, realize you were supposed to stitch the tape only on the right size , matching right sides to right sides, and finish off the back with a blind stitch. C'est la vie.
(Step 9) Revel in your first quilt ever! And reflect on changes for next time.

Aaaaaaaaand DONE. Very pleased with how it turned out, especially considering the amount of learning involved in this project.
Some reflections and learnings so you don't make the same mistakes:
1. Precision. Precision. Precision.
I thought I was pretty handy with a rotary cutter and quilters rule. I was wrong. I was so wrong. It was evident when sewing things together, especially the strips, that I wasn't nearly as precise as I wanted to be. I also could have done better when sewing at the machine - my seams did waver here and there, throwing off the squares and their corners.
Also - bias tape. Don't look too closely and we'll both pretend like we don't see how off it is.
2. The walking foot is friend, not foe.
I don't know why I was so intimidated by the walking foot - it was great! It did take about five minutes to figure out how to install it, but once it was on and I used some scraps to check the tension, it was a breeze! I think next time I will try quilting at the machine along some nice, straight lines.
3. Scrap quilts are great stash busters.
I didn't realize how much I had shoved to the bottom of the basket until I started pulling out and matching for color palette. There's a lot still in there with the potential to make some more quilts!
Notes for next time I try:
Stand up when using the rotary cutter. Stop pretending you have the same amount of tension when seated because you clearly do not.
Try quilting with the walking foot - stitch in the ditch.
To bind with the bias tape, sew to the top, then wrap and blind stitch the back by hand.
Choose a better audiobook - that murder "mystery" was very predictable.
I hope you've found something useful, helpful, or entertaining in this rather lengthy post. I encourage you to try something new and grow your skills - comment below, send me a message here or on Instagram to share your success (or lesson learned)! Until next time, friends - have a happy Thanksgiving!*
*You know, separately...and in your own homes.


Комментарии