
Apparently, I enjoy restoring antique crafting equipment. This is something I've recently learned about myself. Prior to my antique spinning wheel, I had never done anything like this before, and yet, here I am doing it again (twice actually, as I've just purchased another antique spinning wheel).
This beauty was a Christmas gift with which I am well pleased. She's a 1920 (or possibly early 1921) Singer 66-1 Treadle sewing machine and I am very excited to get her in sewing shape and try her out! But first, she needs some TLC.
In this post, we'll take a look at some research (including all my resources) and clean up the machine herself. The cabinet and cast iron restoration will come in later posts (be sure to follow if you want to read them!).
A quick note: NONE of the links included in this post are affiliate links. They are all linked because I personally used these resources in the process of working on the machine.
Stage 1: Research
I often start my projects with a research phase. In the case of doing something I have never attempted, it's a definite must. In this case, step 1 was learning about the history of the machine.
The absolute best resource for antique sewing machine research is the International Sewing Machine Collectors' Society (ISMACS). Their website is filled to the brim with basic information, data tables, and original paperwork like manuals. Because this is a Singer sewing machine, it has a serial number prominently featured on the front of the machine. Although Singer removed their own database of serial numbers, ISMACS has a complete copy here. My machine's serial number is G8155131. From the serial number alone, I learned the following:
Machine class (model number): 66
Quantity allotted: 50,000
Date allotted: June 23
Year allotted: 1920
This means that my machine was part of a batch of 50,000 identical machines which began production in late June of 1920. The serial number range for the batch was G8120226 through G8170225 so mine would have been produced in the middle of that run. So it's possible the machine would have been produced in late 1920 or early in 1921.
From various sources, I believe this machine was produced at the plant in Elizabethport, New Jersey although I am not overly confident in that declaration.

The decal design is often referred to as a "red eye" by collectors, so called for the prominent shape on the front of the machine in red. Singer documentation uses the phrase "red scroll." Red eye treadle machines were only produced from 1906-1923 so this machine was chosen by the purchases over early electric models such as the Singer 101.
There are several variations on the model 66 - I know this to be a model 66-1 as it is a treadle machine with a dial to change the stitch length (instead of the later lever feature). My machine also has the earlier version of the bobbin case which I learned while cleaning and confused as to why my bobbin case didn't look like the ones in the manual photos (the manual available online was for a later version of the 66-1). This aligns with the production date. By the way, the Singer model 66 was produced all the way up until 1956!
At the time of purchase, my machine would have cost somewhere between $44.40 and $67.20. That's $884.20 - $1082.98 today! I do not know the history of the machine or who would have purchased it, but the average salary in 1920 was $3269.40 per year (according to the IRS). Remember that the statistical average does not represent most people as it will skew toward the absurdly wealthy. Today, we usually look at the median instead. Using the IRS data from 1920, 26% of Americans reported between $2000 and $3000 of income that year, so let's assume that the real "average worker" made $2500 in 1920, just for the sake of this argument.
Folks didn't get a lot (read: any) holidays as average, often factory, workers, so let's say this person worked 52 weeks. This gives a payout of $48.07 per week of income. Side note - this seems about right when looking at the income of unionized workers by city in 1921 (Bureau of Labor Statistics). So it would have taken about half a month's wages to purchase this machine when it was made. A substantial investment.
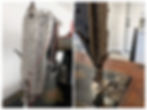
Stage 2: Disassembly
Now knowing some basic history, it's time to move on to cleaning the machine herself. This, of course, required its own research dive to ensure I did not damage the machine in the cleaning. There are quite a few places online where you can find information on cleaning, I've listed my top 3 below:
Bob Fowler (YouTube) - my personal hero, Bob answered my bobbin case question in under 24 hours!

To start this process, I detached the machine from the cabinet and then set out doing as much disassembly as possible. I organized all the pieces using a $4 embroidery floss box with some masking tape across the tops of the rows. That way I could separate the pieces in each box and label the tops in sharpie as I went. This worked out very well, by the by, and I do recommend it.

Some things I learned:
Take pictures of where all the pieces go. You think you will remember. You will not. In fact, maybe just film the whole process so you don't have to keep taking photos.
Use a screwdriver with a head that is rectangular, NOT the v-shaped kind. The v heads can sometimes strip the screw heads.
If you can't get a piece to come out, give it some sewing machine oil and let it set in for a bit. If that's not doing the trick, try some penetrating oil like Liquid Wrench and give it a bit to set before trying the screw again.
--> I made a post on Reddit to get help for one particularly nasty screw, there were a lot of excellent responses you can read here!
One more on screws: use a toothpick or very small flathead screwdriver to scrape dirt out of screwheads before trying to remove. Sometimes this is the only trick you need.
Don't fixate on removing every single piece. It's OK to leave some in place if they really don't want to budge. Do your best to clean around them. As long as it still functions, you're in good shape.
Leave the big pieces inside the cast iron alone. Seriously. Unless they're totally rust-ridden and won't move, this part of the machine is very hard to work on so just leave it be.
Cover the machine table with a cloth when working on the upper half - this will protect the enamel if you accidentally drop a piece.
Cover the whole machine when cleaning pieces to protect it from flying cleaner product.
Can't figure out how something comes apart? Google it. There are a LOT of folks online restoring common machines like the Singer 66 and someone somewhere has posted something about the same problem/question that you are having. For example, I was finding a lot of information on how to remove the bobbin case on the more modern version of the machine where the bracket has a "finger" - mine doesn't. Thank you to Elizabeth over at My Sewing Machine Obsession who wrote this quick instruction on how to remove it. Hint: it's a lot easier if you take the feed dogs off first!
Stage 3: Cleaning
Once you've got your parts out, it's time to clean! I used the following supplies to clean my machine:

Microfiber cloths
Sewing machine oil
Water in a spray bottle
Brasso
Compressed air
Small nylon brush
Small, soft paintbrushes
Bent tip tweezers
Toothbrush
Rubber gloves
Facemask
Needle nose pliers and vice grips (cover the piece with cloth and/or a rubber glove unless it's bare metal before using these!)
To clean each metal piece, I used Brasso and a toothbrush. If there was a very intense layer of grime, I used a piece of 800 grit wet-dry sandpaper on top of the Brasso. This worked spectacularly well. The original pockmarks are still there which show the machine's age, but all rust is gone and the caked on sewing machine oil is gone. Remember to wear gloves as you work! I also recommend wearing a facemask for the fumes as well as for the dust.
If you have an ultrasonic cleaner, that's a good option for the metal parts as well.
The rest of the machine consisted of clearing out lint and dust and polishing up the enamel. In this step it's imperative to protect the decals! Do not use a regular commercial cleaner unless you plan on repainting the entire machine as it will damage the paint.

To clean out the lint and dust (do this first!), I used a soft paintbrush all over. The small nylon brush, tweezers, and compressed air help to get lint bunnies out of the bobbin compartment and some other odd places near the bobbin winder. Once all dust is clear, I sprayed a cloth with some water and "washed" the machine very gently. This helped remove a layer of unseen dust. Finally, sewing machine oil rubbed into the enamel to help it return to its original luster. I left the sewing machine oil on overnight and gave everything a good buffing to remove the excess the next day.
The whole cleaning process took probably about 6-8 hours total.
Stage 4: Reassembly
Everything is clean and it's time to reassemble!
During the cleaning process, you may notice that your machine is missing some parts or that some parts are so damaged, they need to be replaced. I was reasonably lucky in that the parts I needed to order were readily available from Central Michigan Sewing Supplies. I waited until finishing the cleaning process to place the order so I would know all the parts I needed.*
I was also lucky in that the pieces I needed to purchase were pretty easy to identify as "missing." I ordered a new bobbin cover plate, bobbin cover spring and screw (the original cover spring was half missing), and a metal spool pin kit. For good measure, I also purchased some bobbins, universal needles, more sewing machine oil, and a machine oiler with a 4 inch extension spout which will help me to oil the cast iron base later on.
To reassemble the machine, reference the obscene amount of photos you took during disassembly. Carefully put the pieces back together and be sure to use your good screwdriver and don't overtighten the screws!

When the pieces are back together, oil the machine as directed by the original manual. The Singer 66 manual can be found here from ISMACS - the oiling diagram is on page 13. Note that there are a few other versions of the manual floating around the internet. This makes sense when you consider how long the 66 was in production.
Don't forget to also oil the race wick (MQuilter at Color My World with Warmth has a great tutorial on how to replace this)! This piece will keep your bobbin turning smoothly.
A few drops of oil are all you need - don't overdo it! After oiling, run the machine a bit to work the oil into the parts. Mine is still separated from the treadle, so I turned the hand wheel myself for a few minutes.
*Incorrect. I found out later I'm missing at least one more part that I have yet to find.
Ongoing Problem: The Bobbin Winder

I have yet to decide what to do about my bobbin winder. When disassembling, I noticed that the screw meant to help adjust how the winder sits in relation to the rest of the machine is missing. I have not yet found a replacement screw. Additionally, reassembling the rest of winder was quite difficult - a big shoutout to Bob Fowler for this video on refreshing a bobbin winder which helped immensely.

An interesting thing, these bobbin winders. It seems Singer kept changing their design over time. I have seen many different versions online of Singer 66 bobbin winder, none of them like mine. This leads me to wonder if mine was, at some point in its life, "repaired" with a new bolt and that is why the gear no longer engages. This hypothesis is further supported by the amount of thread I found wound in odd places when cleaning the bobbin winder (I had to use tweezers to get it all out) and how poorly the original bobbin was wound and that it was wound with 3 different colors of thread which truly makes no sense from a sewing perspective. It's also supported by the fact that the gear was installed upside down when the machine originally came to me. Someone fiddled with the bobbin winder at one point and did it no favors.

I am hopeful that with more time and research, I will be able to figure out how to get the bobbin winder to function properly. The alternative, it seems, is buying a complete replacement bobbin winder. I don't really want to do that considering I need 2 or 3 small parts to get this one to work. So for now, my modern Brother machine can wind the bobbins.
Moment of Truth: Test Stitching
Before the machine can be officially declared Restored, she must be put through the paces. I followed the instructions in the manual to thread the machine, then ran a bobbin using my modern machine in matching thread and threaded the bobbin as shown in the instructions.
Tip: hold the top thread to the side with one finger and turn the hand wheel to make one stitch. This will pull the bobbin thread up. Use snips or a pin to pull the threads out from under the presser foot and replace the bobbin case cover. (Shout out to my Grandmother who taught me this way back when she helped me make my 8th grade formal dress!)

I got her all threaded and ready to go then grabbed a scrap piece of cotton, lowered the presser foot, and turned the hand crank. And.....it wasn't stitching. GREAT.
After a few more attempts, I realized that the issue wasn't that I had incorrectly assembled the internals, thankfully, it was that the fabric wasn't being moved through the machine. I flipped her over, loosened the feed dog screw, pushed the feed dogs up a bit, tightened the screw, then flipped her back upright.
I double checked that the tension felt right and the stitch length knob was towards the medium length stitch setting and gave it another go. SUCCESS!
Alt text: Above, a short video of threading and test stitching with the restored Singer 66-1 sewing machine, still detached from its cabinet and treadle.
Next Steps
At this point, with the exception of the bobbin winder, she's ready to sew! I'm quite please with how the restoration is going so far. Although she could maybe be a little cleaner in some places, I like my antiques to show their age and character.

Next comes the restoration of the cabinet and the cast iron base. I've never attempted to restore anything like this before so it will surely be an adventure and learning experience with A LOT of research required. From what I know so far, I will need to use some chemical strippers which means I'll be working in the garage. The garage which is currently 40 degrees on a good day.
Spring it is. Until then, friends.

Like the post and want to see part 2? Subscribe to the blog by filling out the form at the bottom of the page! You can also follow me on Facebook and Instagram, here on Pinterest (updated sporadically) or here on Twitch (streaming sporadically). See you soon!
Pssst! I bought another antique spinning wheel! Restoration to begin soon but very slowly as she needs a lot of TLC. Isn't she pretty?!

