Christmas Crafting
- Kat Zimmermann

- Dec 4, 2020
- 23 min read
Updated: Jul 22, 2024

Ah, Christmas. One of the most joyous times of the year, if only because of the implied vacation time and understanding that little actual work will be accomplished following Thanksgiving. Something I particularly enjoy is decorating my home to reflect the seasons - Christmas is an opportunity to do that over-the-top holiday effect free of judgement.
In this post, another long one because I don't know why I keep doing this to myself, we'll go through not one, not two, but FOUR Tutorials for the season (click to jump to each tutorial):
All projects here are beginner to advanced beginner level with some optional suggested extensions for more advanced crafters.
To skip ahead and find what you're looking for, you can use the quick links above OR Ctrl+F on your keyboard to open a search box, then type in the title for the craft you want. On mobile, tap the three dots in the corner of the screen, then click "Find on page" (someone please tell me if it's different on Apple products).
*Update*: You can purchase formatted, printer-friendly versions of the Holly Jolly Tea Cozy and Fit Me Santa Hat on both my Ravelry and Etsy stores!
Off we go!
Project the First: Holiday Bunting

Bunting isn't something we see a lot today, but it's been showing up more frequently. Personally, I like it because it's reusable year to year so I only have to put in the effort once. It can also be super customized, making it appropriate for any occasion. The one shown here is, of course, themed for Christmas, but I've also made bunting for Halloween and Thanksgiving/Autumn and will probably make a new one for Easter this Spring.
Materials:
Ribbon or fabric tape (could be bias tape or a long strip of fabric)
---> How much? That's part of step 1. Remember to buy a little extra so you have space to hang the bunting on either end. Read on, friend.
Triangle template (or shape of your choice - see step 2)
Fabric of choice
---> How much depends on how long your bunting will be - I've found that 1/2 yd in 3 cotton quilting fabrics is plenty for around 8 feet of bunting. Remember that you'll need TWO triangle pieces for each flag unless you're using a double-sided/solid fabric that will not fray
Sewing machine
Thread
Fabric scissors
Cutting mat & rotary cutter (if you have them)
Chalk or pencil or fabric pen (something to mark with)
Follow the steps below to make your own customized bunting!
(Step 1) Determine the length of your bunting.
The easiest way to do this is start with a long spool of ribbon or fabric or yarn that you already have. You could also tape together those flexible measuring tapes that you somehow have so many of.
Grab a friend or family member (household only during COVID please!) if you will hang the bunting somewhere high up.
Drape the fabric strip / ribbon / whatever so that it hangs with the right amount of swag you want to include in your final bunting and mark the length. Then, use a regular measuring tape to see how long it is. Now add some length to that number so you can actually hang the bunting up when it's finished. Now - write it down. Really, write it down. Somewhere where you'll be able to find it later when you decide to make more bunting for another holiday / birthday / festival.
(Step 2) Make your flag template.
I'm partial to triangles myself - they're a classic bunting shape. Of course, you can use any shape you want, it could even be 3D if you're feeling ambitious (and have somewhere to store it in the off season). If you're going off-book here, be sure that your shape will be easy to attach to the ribbon and will still look good if it rotates. If you choose a shape that will attach to the ribbon at a narrow point, remember to use a stiffener between your layers of fabric to prevent it from folding in on itself.
I strongly recommend using paperboard, cardboard, or something sturdy to make your template because you'll be tracing around it quite a lot.
To make the triangular flags shown in all of my photos:

Figure out how wide you want the flag to be. I went with a nice even 6 inches across the top. Draw a horizontal line of this length. Make sure you have some space around the sides so you can add seam allowance later!
Figure out how long you want the flag to be. I went with 8 inches.
Make a mark halfway across your horizontal line (3 inches if you're using my measurements) and draw a vertical line down, marking the length of the flag. Make sure you have a nice 90 degree angle here. If you don't have a quilters rule to help you, use a book cover or pull a box out of your recycling bin to get that nice crisp angle.
From each side of your horizontal line, draw a diagonal line connecting the end of your horizontal line to the mark on your vertical line. Repeat on the other side. This should give you a nice isosceles triangle.
Add seam allowance around the outside. I use 1/2 inch, but you can use 1/4 inch if you're a very precise sewer (I am not).
(Step 3) Calculate how many flags and pieces you'll need.
Here, we do a bit of math. First, let's define some variables:
Let L = the length of your desired swag (my measurement is 7 1/2 feet)
Let w = the width of your flag (if you're following my template, this is 6 inches)
Let x = the number of flags
We know L and w from measuring, but we need to find x. To do this:
x*w = L
then x = L / w
For my measurements, that would be 7.5 feet / 6 inches --> 90 inches / 6 inches = 15 flags (this is x).
That means I will need 15 flags total. Double this number to get the number of pieces you will need to cut out (remember that each flag takes 2!). For me, that means I need to cut a total of 30 triangles.
If you didn't get a whole number, round down and record the remainder. You'll need it later!
At this point, it's time to have some fun with colors and patterns - decide in what order you want your flags to be. If you're familiar with Google Draw, you can take photos of your fabric, then crop the photos to be in the right shape and make copies to play with the order and decide what look you like best. For my Christmas bunting, I'm using 3 different pattern fabrics: red with bells, green plaid, and a red plaid. I decided to use the following order:
[Red with bells, green plaid, red with bells, red plaid] repeat to end, ending with a red with bells. This is honestly a lot easier to count if you just draw it out on paper. This gives me a total of 15 flags, where 8 are red with bells, 4 are green plaid, and 3 are the red plaid.
Double those numbers to figure out how many pieces to cut out of each fabric. For me, it's 16 red with bells, 8 green plaid, and 6 red plaid.
(Step 4) Cut out your pieces & pin shapes together.

The best way to do this is to lay out your template and trace across a row, then fold the fabric right-sides-facing and pin in place so you're cutting out two rows-worth at once.
For triangles, I recommend using the cutting layout shown in the image to the left, where your triangles alternate right-side-up and upside-down to minimize the amount of scrap fabric. Of course, this will not work with a one-directional pattern. For example, if you're cutting out Frozen fabric for a child's party, you probably don't want an upside down Elsa.

As you cut your pieces, be sure to pin the shapes together, right sides facing, so the transition to the sewing machine will be quick.
Remember to leave one side open so you can turn right sides out after sewing.
Generally, that means NOT sewing the side that will sit inside the ribbons (because we'll secure that end when we sew on the ribbon).
(Step 5) Sew, trim, turn, press.

Head over to your sewing machine and stitch around the edges of your flags, removing the pins as you go.
Again, remember to leave the top of the flags open - this is necessary to turn them right side out.
Also remember to follow the seam allowance you set when making your template. I used 1/2 inch.

Once all the flags have been stitched, go ahead and trim the seams down to 1/4 inch (unless you used 1/4 inch seam allowance, in which case leave it be).
I've used pinking shears to trim my seams to help with the fraying issue. Don't worry if you don't have pinking shears, regular scissors will do just fine.
Do remember to snip the tip of the flag as well so you get a decent turn.

Head over to the ironing board and start heating up your iron to the warmest temperature appropriate for your fabric. I used cotton, so the iron was set pretty high with medium steam.
Turn your flags right side out and press. You can use a turning tool or pencil to help get the points nice and clean when turning.
(Step 6) Pin flags in place & stitch
Remember that math we did at the beginning? If you got a whole number of flags, then your flags will butt up against one another. If you didn't get a whole number, you need to do a little bit more math to figure out the spacing.
Let w = width of one flag
Let R = remainder from the earlier math
Let x = number of flags
Let s = amount of space between flags
To solve for s: (R * w) / (x - 1) = s
For example, if I was making bunting to cover 9 feet 3 inches of space with flags that are 6 inches wide, I found my number of flags at the beginning by doing
x = L / w = 9 feet 3 inches / 6 inches = 111 inches / 6 inches = 18.5 flags
So I would have made a total of 18 flags and my remainder, R, is 0.5 of a flag. Since my flags are 6 inches wide, w, that amounts to 3 inches left over. This is the top of our equation to find s (AKA the numerator), R * w.
Next I'll do the denominator, x - 1. I have 18 flags total, x, and subtract 1, that's 17. I have 17 spaces between all of the flags.
Finally, I'll solve for s by taking the numerator and dividing by the denominator: 3/17ths or 0.18 inches between each flag. Were I actually making this example, I'd probably round to 3/16ths of an inch because that's actually marked on my ruler and it's close enough.

OK enough math! Pin your flags to the ribbon. If you're a beginner sewer, you'll probably want to do one ribbon at a time. If you're feeling confident, you can do both top and bottom ribbons. Remember to leave that extra bit at the beginning and end of the ribbon so you can actually hang the bunting.
A note on ribbon choice - here I've used two inch wide ribbons because that's what was on sale. You can also do a single 2 inch wide ribbon (or fabric strip or whatever), folding over in the center to wrap around the tops of the flags.
Remember to follow the order of fabrics and colors you set at the beginning and space as found above! If you had a perfect division at the beginning (no remainder), your flags will have no space between them.

Once your pins are all in place, sew along the top and bottom of the ribbon, as close to the edges as you can manage (topstitching). Remember to backstitch at the beginning and end of your seams!
At the ends of the ribbon, use a match / lighter / candle to melt the ends together. If you used a natural fiber, just turn the edges in and topstitch to finish.
Done! Hang and enjoy all season long.
Project the Second: Festive Table Runner

Table runners are a great way to make your table festive with a really low amount of effort.
Of course, you can make very fancy table runners, quilting pieces together to form an elaborate pattern.
Personally, I prefer a simple table runner made in a patterned fabric and wide enough to use as a placemat. It's a nice effect and I have any extra linens to wash. Win win.
Materials
Fabric of your choice (see step 1 for sizing)
Matching thread
2 weights for the ends (quarters, washers, tassels, whatever)
Sewing machine
Fabric scissors OR rotary cutter and cutting mat
Long ruler
Chalk / pencil / fabric pen (something to mark with)
(Step 1) Determine the size of the table runner.
This math is pretty simple: measure the length of your table. Now add 16 inches (8 inch overhang on either side). Congrats, that's the length of your table runner. For my little table, that's 72 inches + 16 = 88 inches.
To determine width, you can just measure across the table and see what looks right to you. You can also just use my measurement: 20 inches. Plenty wide to serve as a placemat.
Remember to also determine your seam allowance and add that to the measurements you write down for the next step. I like 1/2 inch, so that means I'll be cutting a 21 inch wide by 89 inch runner.
So how much fabric do you need? You will need TWO pieces, so make sure your runner's width measurement can be doubled across the width of the fabric. If not, you'll need double the length of the runner in fabric. For my width, I planned on using regular 44 inch wide quilters cotton. Since I need two 21 inch widths, that fits just about perfectly across the fabric. This meant I just needed to order the total length of the runner (65 inches), rounded to the nearest half yard - 2.5 yards total.
(Step 2) Cut out your pieces.

After you've pre-washed and pressed your fabric, lay it out on your cutting table. We'll first cut it down to the right width and length, then do the triangles for the ends.
Fold the fabric lengthwise (hot dog style) with right sides together. AKA, selvage to selvage.
Now, fold the fabric in half the other direction (along the selvages). If that doesn't make sense, skip it - it just means you'll have to measure and cut the end triangles twice instead of all together.
You might notice that in the photo, I've clipped the fabric layers together with hem clips to make them behave and hold still. This is a great trick when working with multiple layers or heavy fabrics.
Square up the edges, then measure and mark the width of your table runner. For me, this meant trimming the selvages off (shown in the photo), then measuring over 21 inches and cutting a straight line parallel to where the selvages were.
If you folded the fabric twice as I did, this should mean you're cutting through four layers of fabric at once. If you rounded your fabric purchase to the nearest half yard, go ahead and just cut the width out all along the length of your fabric to make a big rectangular strip.
If you have more fabric than the total length, cut the fabric down the appropriate length. If you've folded the fabric so the ends are together, you'll take HALF of what needs to be removed and trim that off the end (because you're cutting it from both ends at once).

Now we cut the ends to make the nice triangular point. If you would prefer a rectangular table runner, skip this step.
To make the point, mark halfway across your runner's width (10.5 inches for me) and decide how severe you want your angle. I went with 8 inches vertically. Mark that height on both sides of the runner, then connect it to the center marking with a straight line. This should shape your triangle. Cut along the line for all layers. If you are only cutting two layers, repeat at the other end.
(Step 3) Pin & Sew.
Work your way around the table runner, pinning along the edges. A quick tip on pinning: you want your pins to be perpendicular to the edge of the fabric. This lets you come right up to the pin when sewing and helps prevent the fabric from slipping along the length of the pin. The video to the side shows the pinning process in a time lapse.
Remember to leave a gap large enough to turn the project right side out. I like to mark the gap with a double set of pins so I remember to actually stop when at the sewing machine.
Once all the pins are in place, sew round the table runner, remembering to leave your gap and following the seam allowance you set at the beginning. Pro-tip: Mark the gap with a pin or clip so you can find it in the next step.
(Step 4) Trim, turn, press.

If you used anything larger than 1/4 inch seam allowance, trim it down to 1/4 inch. I like to use pinking shears because it helps prevent the fabric from fraying. If you don't have pinking shears, no worries! Regular cutting will do just fine.
Using the gap you left while sewing, turn the table runner right-sides-out.

Using an iron heated to an appropriate temperature for your fabric, press all the way around. You may need to fiddle with the seams a bit to get them to turn all the way out. That's OK - take your time.
Remember to also press your gap so it sits flush with the rest of the seams. I also like to pin along my fresh pressed seams so they stay put while topstitching in the next step.
(Step 5) Add weights & Topstitch

Weights are technically not necessary, but I like my table linens to stay where I put them. For this example, I'm using two quarters to provide the weight. You can really just just about anything for this as long as it's not plastic which may melt in the dryer and ruin all your work. Washers work particularly well.
Insert your two weights via the gap you left while sewing and jostle them generally towards either end of the runner. Keep them away from the edges for now - you don't want to hit one and break a needle while topstitching!

Topstitch around the table runner using your matching thread and removing any pins as you go. Again, be careful to avoid the weighs you just added. Remember to also stitch across the gap.

Once you've gone all the way round, find your weights and jostle them so they sit in the tips of the ends of the runner.
Stitch a straight line just above the weights so that they're trapped in the ends and won't go a-roaming when you put it through the washing machine.

That's it! Go add your new table runner to your decor and brag to all your friends and family that you made it yourself.
Project the Third: Holly Jolly Tea Cozy

Teapots and tea cozies are somewhat underrated, in my opinion. If I had more people to share my tea with, I would probably have about a dozen themed cozies by now. I might do it anyway and start consuming absurd amounts of caffeine as an excuse to use them.
Anyway. This tea cozy is made to perfectly fit my Longaberger teapot gifted to me by my grandmother. It's a pretty decent size teapot and larger than most I've seen. The instructions below note in italics where to make adjustments to fit your own teapot. The project takes only a few hours to complete.
If you will adjust the pattern to fit your own teapot, you'll need to start recording your stitch numbers when you make the "flaps" - that's beginning at row 14 in the pattern below.
Materials
Yarn - weight 4 is suggested. You can use any fiber. You'll want cream/white for the main color, a little red for the berries, and a little green for the holly. I've used DPY (Dead People Yarn) from my stash so don't ask me what it is because I don't know.
Size H crochet hook (5 mm)
Tapestry needle
stitch markers
Snips
3 buttons
Needle and matching thread (recommended: thimble)
Teapot - keep it on hand while you work so you can make size adjustments if that's part of your plan.
A side note - this can easily be adapted to other seasons and themes by simply changing the decoration. Get creative!
Gauge: 13 sts = 4 inches
15 rows = 4 inches
Always measure your gauge!
To make the cozy, we'll start at the top, making a circle to cover the lid and marking where to leave space for the handle and spout. Then, we'll make a flap down one side and repeat to make the flap on the other side. Finally, we'll add buttons and finish the edges while also making button loops.
Abbreviations (US) terms:
MR - magic ring
sc - single crochet
hdc - half double crochet
dc - double crochet
inc - increase (sc 2 in next st)
sc2tog - single crochet two together
sts - stitches
Ch - chain
slst - slip stitch

R1: MR, sc 6 in ring (6) (Always mark your first stitch).
R2: Inc. around (12)
R3: *[sc, inc.], repeat from * around (18)
R4: *[sc next 2 sts, inc.]. Repeat from * around. (24)
R5: *[sc next 3 sts, inc.]. Repeat from * around. (30)
R6: *[sc next 4 sts, inc.]. Repeat from * around. (36)
R7: *[sc next 5 sts, inc.]. Repeat from * around. (42)
R8: *[sc next 6 sts, inc.]. Repeat from * around. (48)
R9: *[sc next 7 sts, inc.]. Repeat from * around. (54)
R10: *[sc next 8 sts, inc.]. Repeat from * around. (60)
R11: *[sc next 9 sts, inc.]. Repeat from * around. (66)
R12: sc in each st around. Ch 1, turn. (66)
At this point, your top circle should be about 2 rounds away from touching the spot and handle. To adjust - stop increasing the circle whenever you're 2-3 rounds away from the "edge" of the top of the teapot. Mark where the handle is- you will leave these stitches unworked moving forward.
R13: Sc in next 60 sts. Ch 1, turn. (this leaves the stitches that will be above the handle unworked). (60)
R14: Sc 25. Ch 1, turn. (25) To adjust fit, work sc up to where the spout is, then ch 1 and turn. Begin recording your steps from this point forward - you will need to repeat them on the other side.

R15: Sc 25. Ch 1, turn. (25)
R16: Inc, sc 24. Ch 1 turn. (26) We begin to shape around the handle at this point. Adjust where the increases are as necessary. You want the flap to get to about the center of the space beneath the handle.
R17: Sc 25, inc. Ch 1, turn. (27)
R18: Inc, sc 26. Ch 1, turn. (28)
R19: Sc 27, inc. Ch 1, turn. (29)
R20: Inc., sc 27, inc. Ch 1, turn. (31) We continue the increase to work around the spout. Adjust as needed.
R21: Sc 31, Ch 1, turn. (31)
R22: Sc 30, inc. Ch 1, turn. (32)
R23: Inc, sc 31. Ch 1, turn. (33)
R24: Sc 32, inc. Ch 1, turn. (34)
R25: Inc, sc 33. Ch 1, turn. (35)

R26: Sc 34, inc. Ch 1, turn. (36)
R27: Inc, sc 33. Ch 1, turn. Leave the last 2 sts UNWORKED. (35) Here, we start to back off from the space beneath the handle and leave space for where the handle attaches again to the teapot. Adjust as needed for sts unworked.
R28: [sc 8, sc2tog] 3 times, sc 5. Ch 1, turn. (32)
We also begin to decrease, tapering to fit the curve of the teapot. Adjust as needed.
R29: Sc 32. Ch 1, turn. 32)
R30: [sc 7, sc2tog] 3 times, sc 5. Ch 1, turn. (29)
R31: Sc 29. Ch 1, turn. (29)
R32: [sc 6, sc2tog] 3 times, sc 5. Ch 1, turn. (26)
R33: Sc 26, Ch 1, turn. (26)
R34: [sc 5, sc2tog] 3 times, sc 5. Ch 1, turn. (23)
R35: Sc 23. Bind off and weave in end.
Now, we will make the "flap" to match on the other side of the circle.

Join yarn to top circle with wrong side / underside facing you, leaving 6 sts unworked where the handle sits. Ch 1. Adjust the appropriate amount of unworked sts to fit the size of your handle.
Repeat R14 - R34. If you joined the yarn correctly, you should be working starting at the handle and moving towards the spout for R14.
Second flap R35: Sc 22, 3 sc in last st. Do not bind off.
Put the loop on hold either by making it very loose or using a chain marker to prevent it from undoing itself.

Now, we will add the buttons. You'll need one button in each location:
In the space beneath the handle
Below the handle
Below the spout
Strictly speaking, you could also just use some scrap yarn to stitch the flaps together under the spout. Personally, I prefer the buttons.
Mark where the buttons will be (see photo above where I used pins to do this), then secure your buttons with needle and thread.
Mark where the button loops need to be using stitch markers, pins, or clips.
Pick up your yarn once more. We will now finish off the edges and create the button loops by working slsts around the whole outside.
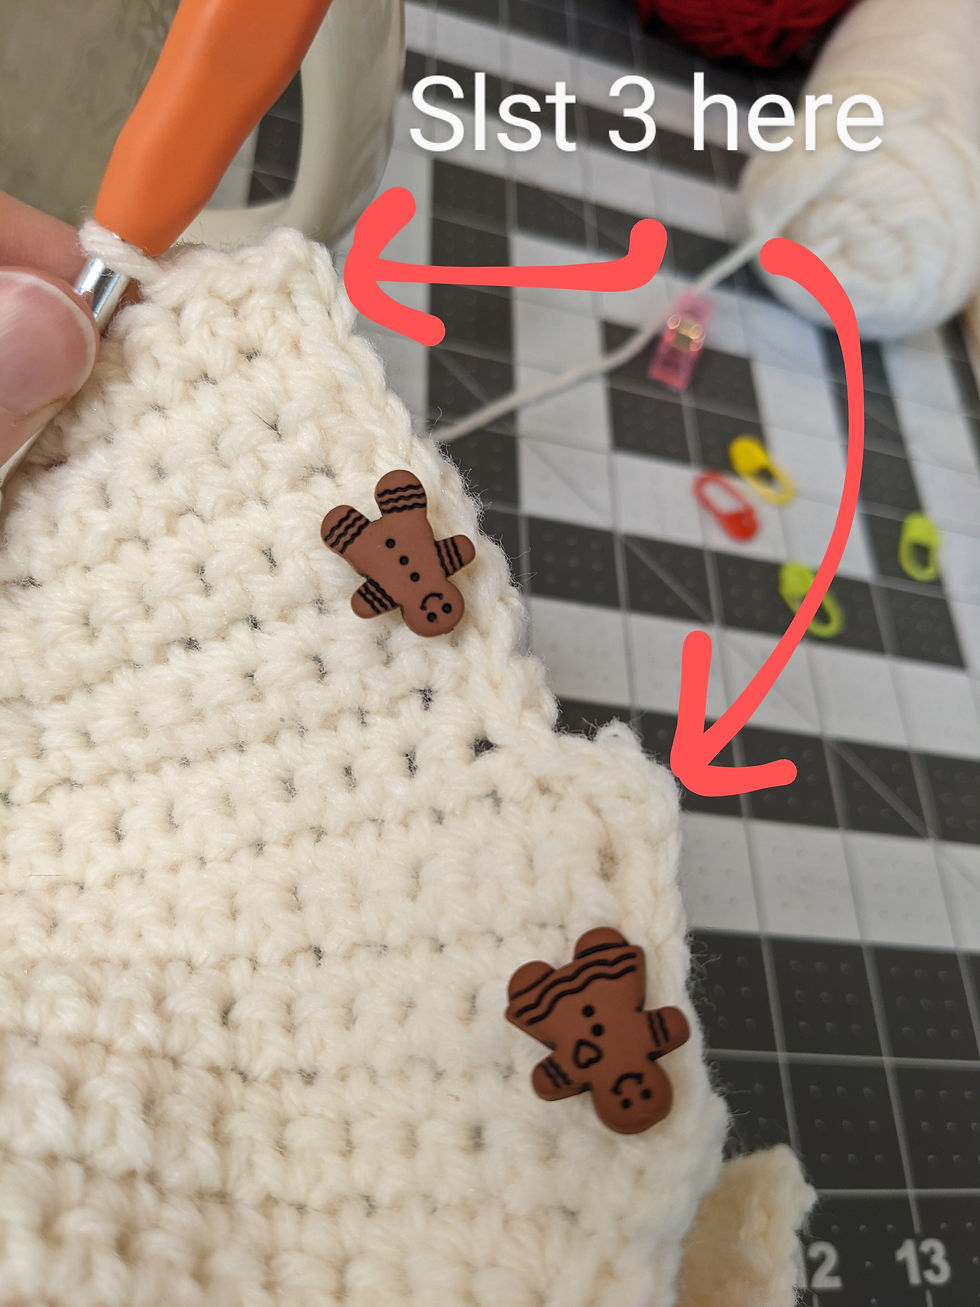
Finish: Slst around the edge of the entire cozy, chaining 3 and skipping the sides of two rows where the button loops need to be (adjust ch length for your buttons). Work 3 slst to go around corners. Slst into the first st to complete the edge. Bind off and weave in end.

Hard part is done! Time to make the decorations.
Berries (make 3)
R1: MR. Sc 3 in MR.
R2: Inc. around (6)
R3: Sc around (6)
Cut yarn, leaving about an 8 inch tail. Use a tapestry needle to weave the tail through the scs and pull tight to form a ball. Leave the remaining tail for attaching to the cozy.

Holly Leaves (make 2)
I'll be referencing the Jolly Holly pattern by Attic 24 for these leaves. The original pattern uses UK crochet terms so I've re-written it here in US terms. Definitely check out the original pattern if you're unclear on something - she has a lot of pictures to help you!
Picot: [sc, ch 2, slst into 2nd chain from hook, sc] into next st. (forms a bump)
Ch 10. Begin working into 2nd ch from hook.
R1: *[sc, sc, hdc, dc, 2 dc in next st, hdc, sc, sc]**, ch 1. Working into other side of the original ch 10, repeat from * to **. Slst into base chain to form the bottom of the leaf.
R2: Slst into next st. Picot (see above). [Slst next 2 sts, picot] twice. Slst into next st, picot. [Slst next 2 sts, picot] twice. Slst into bottom.
Stem: Slst "through" the center of the leaf to form the stem on top. Cut a long tail and pull through to the back for sewing.

Attach the pieces to your tea cozy in whatever arrangement makes you happy. I like the two leaves to sit opposite one another at a slight angle with the three berries grouped in the center as a triad.
Happy stitching!
Project the Fourth: Fit Me Santa Hat

I love a good Santa hat - makes me feel very festive with very little effort. Problem is, I have a giant head. It's true. Hats usually don't fit me and when I can squeeze them on, they give me a headache. Luckily, Santa hats are very simple to make and easy to adjust in size!
The full pattern for my giant head is below, but we'll start with instructions on how to figure the pattern out for whatever size you need. Start to finish, this hat took me about 8 hours of knitting and was finished in a weekend.
Materials
Yarn: I recommend any size 4 yarn. You'll need two colors - one for the trim and pom-pom and one for the main hat. I've used Red Heart super saver in white and Caron one pound in country rose (happened to be in my stash)
Size 8 knitting needles (5 mm) - circulars are recommended, but you can use dpns if you prefer.
Snips
Tapestry needle
Stitch marker - recommended to help you remember when to mark that you've finished a row on your stitch counter

Gauge - you must knit a gauge swatch to adjust the sizing
22 sts = 5.25 inches
15 rows = 2.5 inches
How to adjust the pattern for your size:
First, measure your head. Measure where you actually want the hat to sit. For me, that's around my forehead and the base of my skull, so a bit of a diagonal. I have a measurement of 23 inches.
Next, knit the gauge swatch and measure out how many stitches you have per inch.
To determine how many stitches you'll need to cast on at the brim, we figure out a bit of negative ease so the hat actually stays on (multiply your skull measurement by 0.8), then use a proportion to calculate the number of stitches needed at the brim.

Importantly, whatever our final value is for number of stitches must be rounded up to the nearest multiple of 4. This is because we'll use a 2x2 rib at the brim and we want it to be an even k2p2 all the way around. A multiple of 2 only could give us a weird k4 or p4 blob at the beginning of each round.
Once you've determined your starting number of stitches, you just need to figure out how to decrease for the actual hat. To figure this out, pick a factor of your stitch count. Since I'll be using 80 stitches, I could choose either 10, 8, 5, 4, or 2. I went with 8 - this is how many times I'll decrease on the decrease rounds.
I'll now divide my stitch count by this value. For me, that's 80 sts / 8 = 10. So to figure my initial decrease, it'll be over a total group of 10 sts. The last 2 sts in this group will be a k2tog. So, subtract 2 from your group number. For me, that's 10 - 2 = 8. What that means is my first decrease round will be [K8, K2tog] around. Then I'll do a bunch of rows just K around. My next decrease round will be [K7, K2tog] around, K around for a few rows, then [K6, K2tog] around, etc. See the pattern? Each decrease round you just lower the K number by one.
How many rows between decreases? That's up to you. My hat is around 20 inches long without the tassle - I went with 14 rows between each decrease. There's some math here, and you can make it tricky, but easiest way is to count how many times you'll decrease (think: first one is K8 K2tog, then K7 K2tog....how many times until you get down to just K2tog?). Then:
(Number of K rounds between decreases + 1) * Number of decreases = total rows
Then use your gauge to figure out how long it will be:

Importantly, we will start the hat with 6 inches of straight stockinette. So add 6 to the number you get above to get the actual total length.
Too long? Subtract some knit rounds between decreases. Too short? Add more knit rounds between decreases. Play around with it until you like the length.
Knitting goes like this:
Cast on your total stitches.
K2P2 around until you have 3 inches of ribbing.
Change colors and K around until you have 6 inches of the new color (9 inches total). You might want only 4 inches for a child-size hat if it's a small child.
Decrease round.
K around for your pre-determined number of K rounds between decreases.
Repeat the previous two lines, following the decrease pattern described above and following that with your number of plain K rounds.
At the end of the hat, don't bind off (see pattern instructions below). Add the pom-pom.
Full pattern for a 23 inch adult head:
Abbreviations:
K - knit
P - purl
K2tog - knit 2 together
sts - stitches

Cast on 80 sts using white yarn.
Join in the round and work K2P2 around until you have 3 inches of 2x2 ribbing (about 18 rounds)
Change to red.
K around until you have an additional 6 inches of red knitting (9 inches total) - about 36 rounds.

Shape hat:
R1: *[K8, K2tog], repeat from * around.
R2 - R15: K around (72 sts).
R16: *[K7, K2tog], repeat from * around.
R17 - R30: K6 around (64 sts).
R31: *[K6, K2tog], repeat from * around.
R32 - R45: K around (56 sts).
R46: *[K5, K2tog], repeat from * around.
R47 - R60: K around (48 sts).
R61: *[K4, K2tog], repeat from * around.
R62 - R75: K around (40 sts).

R76: *[K3, K2tog], repeat from * around.
77 - R90: K around (32 sts).
R91: *[K2, K2tog], repeat from * around.
R92- R105: K around (24 sts).
R106: *[K, K2tog], repeat from * around.
R107 - R120: K around (16 sts).
R121: K2tog around.
R122 - R135: K around (8 sts).


Cut yarn, leaving a long tail. Do not bind off. Thread tail through sts using a tapestry needle. Then, remove needles and pull tight to close. Tie a single knot to hold. Weave in end.
Make Pom-pom:
Wrap white yarn around your fingers 60 - 100 times. You can also use a piece of cut cardboard here about 4 inches across.
Use another piece of yarn to gather the loops and tie tightly across the center, pulling yarn into a bunch. Tie a knot and leave a long tail for sewing.
Cut the loops and trim pom-pom to be even around.
Use the tapestry needle to pull long pom-pom tail through the top of the hat. Weave in end, adjusting the length of the string to let the pom-pom hang.


[The images in the gallery above show the steps described above to make the pom-pom. If the instructions are insufficient as descriptive text, please leave a comment or send me a message.]

Your hat is now finished! If you feel like blocking, now is the time to do it. However, I did not bother because I didn't mind the slight lumps on the decrease rounds.
A great benefit of having a knitted Santa hat - it's warm! Great for wearing on your COVID-masked walks around the block to bring a little holiday cheer to your neighborhood.
There you have it, friends! Four beginner projects to kick start your Christmas season.
This post and the last were pretty long, you can expect the next few to be a tad shorter.
Posts come every other Friday - remember to subscribe to the site and follow me on Instagram (@crafetmatics) to make sure you never miss one!
Now, go forth and bring some Christmas spirit to the world!


Love these Xmas projects! Another good thing to use for weights that are sewn into a hem is a metal washer. The bonuses are that you can sew a washer to stay in place through the hole in the center and washers come in different weights and sizes. For the bunting, if longevity isn't a problem, could the two fabrics be attached back to back with double-faced fusible interfacing and then cut into triangles? It would save on sewing time. The interfacing would give the triangles some 'starch' as well. The bunting ribbon could be single fold bias tape, inserting the upper edge of the triangles into the fold and sewing across for saving even more time or for those…